LESSON 2 - GENERATING GERBER FILES
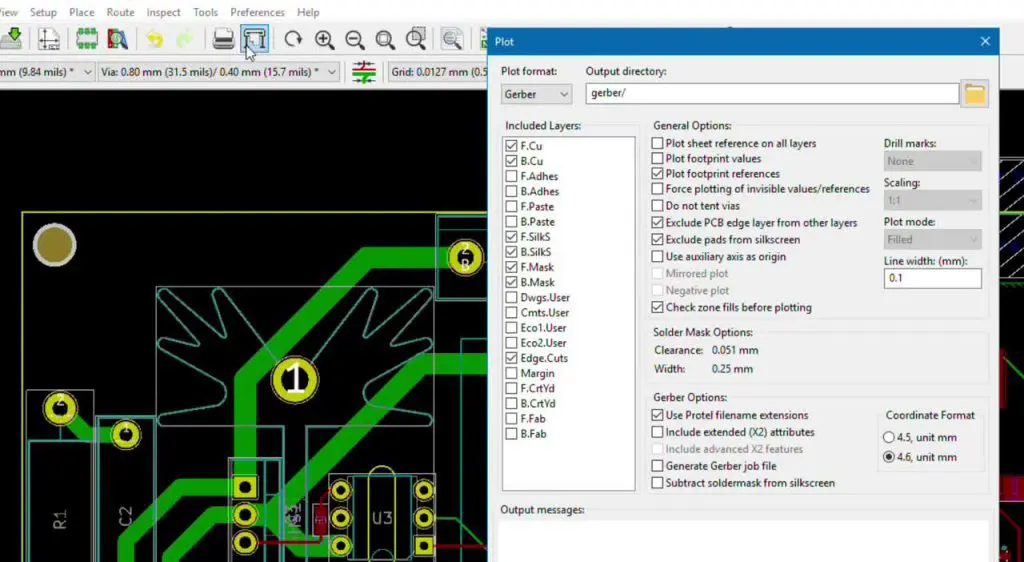
This article is part of the series of articles called Semblie’s little school of electronics done by our apprentice-intern. This series of articles is intended for beginner electric engineering enthusiasts. We hope this will help you lay some foundations in your electrical engineering endeavors.Here we have a complete PCB for a reflow oven. To generate our files for our project. In the PCBNEW mode Select the PLOT icon in the top menu, in the PLOT FORMAT click on gerber and add an Output directory. For a 2 layer board include these 7 options. You can select all the necessary options here.

With all that done, you can click on Plot and an output message will be shown.

Drill files
Now, let’s generate drill files.
Select your preferred drill units and click on Generate Drill Files.
All generated files need to be compressed before uploading to the manufacturer’s website. After you drag-and-drop the packaged file you can choose from a variety of options, but keep in mind these increase the price. We suggest leaving most of them on default. You can add the stencil to the bucket if you want to use a solder paste as it makes the soldering process much easier.
Great, you can order your first PCB now!
Logo on the PCB
If you want, you can even add a logo on your PCB. The image format needs to be PNG and the image needs to be grayscale. Save the logo in the first library on the list. Now click on the icon as shown on the image below. Choose the image that you want to place, find a nice place for it, and you’re done.
That’s it, hope that you have learned something today.
If have any questions, please contact us at info@semblie.com, we are more than happy to help you out.

Benjamin Hodžić
Intern
An electrical engineering student from Bosnia. He’s doing the apprenticeship at Semblie d.o.o. Tuzla.

S
